I am currently finishing up efforts on my largest integration yet and I wanted to write about the design, moving parts and lessons learned. In this first part of the series, I will discuss the high level plan and overview of what components in ServiceNow I plan to use. I’ve not seen this approach used exactly before, but it seemed to be the best way to tackle my issue and hope for feedback.
The Goal
- Move away from consuming .csv file on FTP for our user/location data
- Centralize sensitive data feeds of user profile data with REST.
- How many times do multiple systems want to get a user feed from HR? We will aim for a REST endpoint to gather the data and make endpoint available for many apps (this is outside of ServiceNow scope). Build smarter.
- Avoid cloud platform to cloud platform data integration where possible.
- It is challenging to centrally control your data when cloud apps are sending data wild west style to each other outside of your network

The Approach
The first challenge was to think about which approach to take with ServiceNow’s REST toolset.
Option 1) REST direct to table
You can write directly to the user table using REST. This is great in theory but has its disadvantages.
![]() Minimal Customization – All the heavy lifting is done by the side sending the data
Minimal Customization – All the heavy lifting is done by the side sending the data
![]() Minimal Flexibility – Challenge to manipulate the data if needed, what they send is what you get
Minimal Flexibility – Challenge to manipulate the data if needed, what they send is what you get
![]() Reference Fields – This approach expect the sending system to populate Reference Fields with sysIDs. Unless its reasonable to provide the sender with a hardcoded set of sysIDs with very little variation, this is always a problem.
Reference Fields – This approach expect the sending system to populate Reference Fields with sysIDs. Unless its reasonable to provide the sender with a hardcoded set of sysIDs with very little variation, this is always a problem.
![]() Expected Field Names – Your sending system must provide the fields with the exact expected ServiceNow field names
Expected Field Names – Your sending system must provide the fields with the exact expected ServiceNow field names
Example
POST https://[instance].service-now.com/api/now/table/sys_user
Option 2) Import Set Rows & Transform Maps
My normal go-to, Import Set Rows & Transform Maps give you excellent functionality and tool set built for integrations
![]() Moderate Customization – You will have to receive data, stage it and map it to desired fields. Flexibility provided with field level scripting and transform map scripting.
Moderate Customization – You will have to receive data, stage it and map it to desired fields. Flexibility provided with field level scripting and transform map scripting.
![]() Moderate Flexibility – You can manipulate date before writing to the final desired table(s). Most use cases requiring scripting can be satisfied here.
Moderate Flexibility – You can manipulate date before writing to the final desired table(s). Most use cases requiring scripting can be satisfied here.
![]() Reference Fields – This approach expect allows you to receive non-sysIDs and easily populate reference fields
Reference Fields – This approach expect allows you to receive non-sysIDs and easily populate reference fields
![]() Expected Field Names – You can choose the name of the fields that the sending REST message will be including, allowing you to tailor to their needs.
Expected Field Names – You can choose the name of the fields that the sending REST message will be including, allowing you to tailor to their needs.
![]() Basic Error Handling – A lot of stuff is already built for you as far as error handling, such as responding with rejection if expected data is not present.
Basic Error Handling – A lot of stuff is already built for you as far as error handling, such as responding with rejection if expected data is not present.
![]() Most useful with “flat” data – If your sender is providing data sets within multiple levels/nodes of JSON, it takes a bit of scripting to step through each node for each field.
Most useful with “flat” data – If your sender is providing data sets within multiple levels/nodes of JSON, it takes a bit of scripting to step through each node for each field.
![]() Version Control – Unlike more mature REST endpoints, you cannot contain multiple versions of your integration endpoint should it evolve overtime and especially if you have multiple integrations on the same endpoint where some may upgrade before others.
Version Control – Unlike more mature REST endpoints, you cannot contain multiple versions of your integration endpoint should it evolve overtime and especially if you have multiple integrations on the same endpoint where some may upgrade before others.
For the most part, Option 2 has always done a good enough job for me. It’s error handling was convenient though it left some to be desired. The version control is a great feature but many integrations fair fine when there is only 1 other system involved.
Option 3) Scripted REST
The final option is a more advanced framework with maximum flexibility, though you may find yourself having to build out all aspects.
![]() Potentially most of the benefits of Option 2, however…
Potentially most of the benefits of Option 2, however…
![]() .. Everything is just a little more manual work to build. Build your own Response Status Codes and Error Handling from scratch. Write the code to do all field name grabbing, data manipulating, reference field look ups and more.
.. Everything is just a little more manual work to build. Build your own Response Status Codes and Error Handling from scratch. Write the code to do all field name grabbing, data manipulating, reference field look ups and more.
![]() Full control of Response Codes – Your success 200 code, internal error 500, etc. Here you can dictate in your code exactly what status codes to return.
Full control of Response Codes – Your success 200 code, internal error 500, etc. Here you can dictate in your code exactly what status codes to return.
![]() Version Control – Allows v1 and such so that multiple integrations using the same endpoint can coexist as you develop.
Version Control – Allows v1 and such so that multiple integrations using the same endpoint can coexist as you develop.
The Decision
Are you still reading this? Great, then you must be on the edge of your seat wondering… which did I choose?

I chose… Option 2 and 3!
Yea – I know, quite the season finale twist if I do say so.. which, I did.
Why was that? Well, for my client I had an extra complexity. Because I have 2 potential data sources sending me data to the same end point at the same time, I have to sort through the data as its received to determine “Do I accept only data set A, data set B, or a combination of each?” While this could be done in Option 2 with lots of script.. it leaves me in a position where I’m doing all most as much work for 2 as I would 3, but not getting the advantages of option 3.
And so I decided to use Option 3 to do my first level checking, while feeding that into Option 2 to give me nice troubleshoot mechanics that are built into ServiceNow plus versioning and custom error handling.
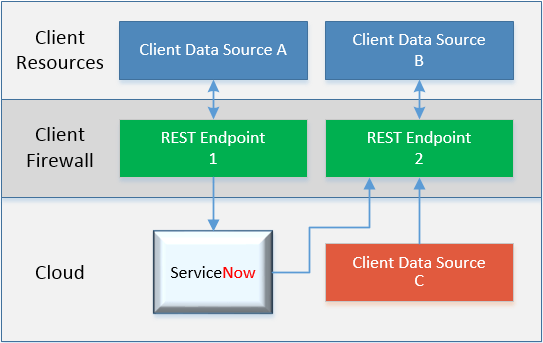
The Design
The goal is to take two endpoints sending me user data from slightly different sources. Most fields have same, but each source has fields and data unique to only its set. I need to accept it, figure out which data set I’m dealing with and put those fields into my import set row. Then, based on the results, I will build a response status code as appropriate. I am also putting the heavy lifting of the Scripted REST code into the Script Include. Finally, we are going to do this all in a scoped app because that’s just the kind of thing we like to do to torture ourselves.

The Wrap
We’ll call it a break here for Part I. When we return in Part II, we will examine a message as it flows through this design and point out interesting pieces that I picked up while building and testing it.
Thanks for following me through this overview – any comments are much appreciated and I look forward to continuing this.
